Introduction
Here are some easy tips on how each model decoder is connected, to make it work first time – every – time. Ever had a problem with your dstv decoder, then disconnected it for repairs and only afterwards remembered that you do not know which cable is supposed to go where?
- Use your phone camera and take a photo of the back of the decoder before you disconnect.
- Label the cables with different color tape, or mark it with a pen.
- Draw a simple diagram.
When your decoder is playing up by doing all kinds of strange motions that it never used to do, it is always worth it to re-boot the decoder – by disconnecting it’s power, or keeping the reset button in for e few seconds. Then exchange the power supply yourself before taking it to the DStv branch or agency for a decoder swap. Below I will show you how to connect the latest models that are currently used, starting with the Explora 3A,& 3B.
Tips on Protecting your decoders & extending it’s life
Automatic Standby:
You can set your decoder to automatically go into standby mode when it has not been used for a certain time. This stops the hard-drive from spinning at a high speed, extending its life.
- Press home – scroll to settings – choose User preferences – then General.
- Then adjust it to the most appropriate time.
Cooling:
Your decoder and it’s hard-drive depends on good cooling in order to operate at maximum capacity and to extend the decoders life.
- Always place your decoder in an area that is well ventilated.
- Never cover the decoder with an ornamental cloth.
- Also do not place the decoder on top of a cloth that can hamper the flow of air through the device.
- Make sure the decoder’s ventilation holes are not covered at all.
- If your decoder has to be stacked on top of another device, like a DVD or sound amplifier, make sure that you place spacers of at least 20 or 30mm between the two devices in order for air to easily flow through your decoder for cooling.
- If the decoder is to be housed inside of a cabinet, there should be large ventilation holes at the back or sides.
- A small silent fan would also help in this process.
Engineers have determined that most electronics tend to last much longer when the are maintained at a constant temperature and not switched on and off all the time. Keeping devices on 24 hours also helps keep away moisture that can do damage. This is then the reason why many hotels at the coast will keep their televisions permanently on.
Power protection:
See our article on cleaning your mains power supply and protecting decoders, televisions and audio equipment against power surges and lightning. This link will take you there.
What you should know about your decoder:
- The screw-on F-connectors can be tightened by hand, but then just lightly lock it with an 11mm wrench to ensure good contact.
- When making use of extra-view, DStv has designed the latest decoders to work without separate heartbeat cables where you have a primary decoder (a master) that sends a heartbeat to up to two secondary decoders (slaves), making the installation much easier than in the past.
- This is done to limit the use of secondary decoders only to devices that can be linked with a physical cable.
- In order to get “Full HD” on your telly with easy control of Pvr etc. You need to have a decoder at each television. This just makes more sense because it is very frustrating to watch a SD picture where the channel gets changed in room 2, just at the most exciting part of your movie in room1.
- All the decoders discussed here are fully Extra-view capable.
1. The DStv Explora Ultra features & connections:

- This latest 2023 model decoder is designed to be a combination of a standard Explora Box and a Streaming Box. You can record as usual, plus you can record Rented movies and Catch-up.
- With streaming it is 4K capable. (The HD Quality of the picture).
- NOTE: You can not record the steaming video. Recording happens only via your connected satellite dish.
| 1. The connections are exactly the same as your Explora 3B. |
| 2. The only difference is the HDMI Yellow connector, that is upgraded to now be 4K compliant. |

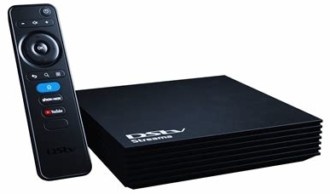
2. DStv Streama – features & connections:

- This 2023 Model decoder is only for streaming and has a built in WiFi / Ethernet capability.
- The decoder requires no dish to operate and is 4K capable.
- It is designed to be fully DIY.
- You do need a DStv account with your choice of package paid-up. Also requires login credentials for DStv Now.
- It is capable of receiving the Showmax-Pro service.
- No recording is possible. It works on the principal of Video on Demand.
- Connections consists of an RJ45 Ethernet, USB, Optical and HDMI out, plus power input.
- This Decoder is not Extra-view capable.
- (STREAMA, Will be launched officially between 14-23 September 2022).
3. How to connect your Explora 3A or 3B.
| *Would you like to learn all your remote control features & tricks. Click here to go to a great explanation. |

- Starting from left to right, the ports are as follows: First port (white label) marked “Unicable In” is where the cable from your Smart LNB gets connected. This will usually be a 7mm white cable coming from outside and will have a screw-on F-connector at the end. The heartbeat also passes through this port, from the primary to then enable the secondary decoders.
- The second PINK connector is your HDMI port for direct transfer of Audio & Video to your Tv.
- The next set of connections are white and red RCA connectors, for Audio. They work together with the bottom yellow one to feed older type of big Box Televisions, that do not have HDMI ports.
- Above the yellow port, you have a Digital out orange RCA port, to connect audio to your sound system.
- To the right we gave an Orange square Optical connector that uses an optical cable to transfer the best quality audio to your Tv, Sound-bar or HiFi sound system.
- The following connector is an ordinary USB port for connecting your decoder to devices that check the software or update the software, done by your DStv technician. It can also be used to power devices like modulators, which the Explora is not equipped with. (A modulator can transfer an SD signal from the Explora to a second TV using the same viewing channel.
- Keep in mind that the USB port is not designed to transfer video from your Explora to any other device.
- The second last Green port, marked “Ethernet” is to connect your Explora to the internet. This can either be done directly with a cat5/6 cable that has RJ45 end connections, or if the decoder is too far away from the “Router” then a WiFi connector can be used to relay the IP signal to the decoder.
- The purpose of connecting to the internet is to get extended services on Catch-up and Box-office.
- The last ‘blue” port is for the power coming from the separate power supply to power up the decoder.
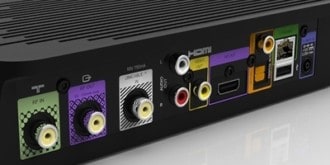
4. How to connect the Explora 2: (second generation).

EXPLORA 2
- Besides the fact that this decoder is slightly larger than the later model 3, you will notice that it has two connectors more, at the far left.
- This is a green one – RF-IN and a Purple port RF-OUT.
- This indicates that this decoder seems to be the last model equipped with a modulator to be able to send an SD signal to a second tv via RG6 RF signal cable.
- These ports was also used to relay the heart-beat between extra-view decoders in older installations. (With Smart LNB’s this second cable is no longer required.)
- The third white unicable port is for the LNB cable. This port can transmit or receive the heartbeat like the Explora3.
- Next is the RCA connectors for the older Tv’s.
- The following pink port is for the HDMI cable to the Tv.
- The next yellow ports are the Digital and Optical ones for audio to your Hifi, headphones or sound bar.
- Next you have the green internet connection at the top, and below you have the USB port for powering the wifi connector. ( These ports are not designed for recording transfers).
- Lastly we have the power input marked as blue.
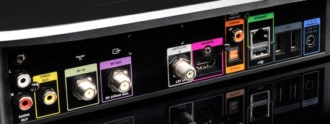
5. How to connect the Explora 1:

Being the older brother, it is slightly larger than the Explora 2. It also has a built in “Modulator” to relay RF-signal to a second tv, with a Tv-link ability to control the decoder from the second Tv as well. This decoder needs to have a “Diplexer” added on to be able to send heartbeat through the Smart LNB when connecting it to an Explora 3.
- The first three RCA ports are connecting to non HDMI televisions.
- Secondly we have an light green port for RF-in, where one can connect a terrestrial antenna to feed through to the second tv. Mostly used for heartbeat.
- The next purple RF-out port is also mostly for heartbeat, but it then transfers any RF-signals to the second television.
- To the right of it you have the white port for the white cable that comes from the LNB. Only a Unicable/SatCr signal will work on an Explora. Those are the signals that the Smart-LNB or switch provides.
- Next you will find the pink HDMI port for HD signal to the Tv.
- The Orange ports are for “Digital Audio” from the RCA port and “Optical audio from the bottom lit-up port.
- Moving right we find the Green top port for your IP (internet) connection. Then just below it, the USB port to power other devices like a WiFi connector. Also used by an DStv technician, but cannot be used for recording transfer.
- Next you will see two more grey tagged USB ports for future use only.
- The last blue port is for 12volt from the power supply.
6. How to connect an HD Pvr. (2P or 2U):

Many of these decoders are still in use, even though this model is getting older it still delivers most of what DStv customers want. ( Recording, Catch-up and Boxoffice). It is just not “Showmax” Capable. It can run of a Universal twin or smart LNB and is extra-view capable if you require only a two decoder setup.(Can only be used in a 2 decoder extra-view)
- On the left we have two screw-on f-connector ports for cables from the dish. If you are using a twin LNB the left one (No2) is for recordings and the right one (No.1) is for viewing.
- When using a “Smart LNB” you will use the No.1 port (SatCr) only, but combine it with the RF-out port via a “Diplexer”, in case you want extra-view requiring heartbeat.
- Next you have your orange digital and optical audio connections for you HiFi sound- system/-bar.
- To the right we see the RCA connectors for connecting older Tv’s without HDMI. (Yellow for video & the other for left/right audio).
- Then past the barcode you see the HDMI port supplying the television with video and audio in HD.
- Next you see the Ethernet port that only is used for special DStv projects, but not for downloads like with the Explora.
- The following USB port has never been put to use in general households.
- The second last ports are the RF-in and out ports for 2nd tv purposes, and heartbeat. When using a Smart LNB the heartbeat in inserted from these to the LNB cable using a “Diplexer”.
- Last port is the power input from the 12 volt power supply.
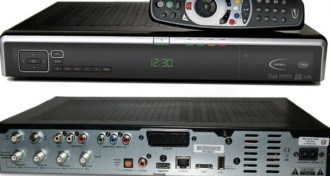
7. How to connect an HD Pvr 4 tuner:

This decoder type still in use after many years have it’s own pro’s and con’s. the main disadvantage is that it still has a power supply that is built into the box. This then requires a fan to cool it down that attracting dust that may affect the hard-drive performance. The advantage is that it can record two programs at a the same time eliminating many conflicts.It has many more connection ports that can confuse one. I therefore discus the purpose of each. (Can only be used in a 2 decoder extra-view).
- At the bottom left, you see four LNB inputs, which means that you will either need a 4 port Quad LNB with four cables into the home to connect to these ports. Or you can connect a “Smart LNB with only one cable to the port marked – SatCr.
- To the right we have the orange audio connectors – digital & optical.
- Next we have the HDMI port for vieo & audio to the Tv or sound bar.
- Next to it is a Ethernet port not usable by the owner of this model.
- To the right we have a SATA port not usable to owner.
- Next there is a USB port, only for quick software upgrades by a qualified technician.
- Lastly we have the 230Volt power input.
- On the top row we start with the RF out-in, that is mainly used for the heartbeat on older installations, with RF out also feeding second Tv’s.
- Then we see the familiar RCA or “Composite” ports for older Tv’s.
- To the right we have three “Component” ports, which are the previous generation HD connectors.
- Next you will see the ancient “Scart plug” used in Europe years ago.
8. How to connect he HD Zapper – 5 to 8S (baby decoder).

Do not be fooled by this little decoder. It has all the HD viewing abilities of an Exlora, it is just made for people that do not have the need to record. I remind you that this decoder can run off of “Smart LNB as well as a “Universal LNB. Let us look at it’s connections:
- On the left we have the LNB port. In the main menu, you just need to select upon starting the decoder up, what type of LNB you are using.
- The orange port to the right is for “Digital” audio to connect to your sound system or Soundbar.
- Next there is your standard HDMI port for high quality video and audio to the tv. If you would connect your earphones to the tv you would get the highest quality sound replication.
- Following is the USB port used for upgrades or to supply power to a “Modulator” (not fitted to this model), in case Granny wants to also watch tv in the bedroom.
- Then you see the familiar Composite ports that can feed an older box tv, or feed the modulator sending AV to the second tv.
- Strange to see a Ethernet port on a baby decoder, but DStv can connect a Router to it to monitor viewer habits, in a voluntary special program that they have going, called DStv-i.
- Lastly there is the 12 volt power supply port.
9. HD Zapper 4U or 4S.

This is the previous generation “Baby decoder. The main difference to the latest model is that it was equipped with a “Modulator, that made it easy to relay a signal to a second bedroom including full Remote control by using a Tv-link.
- On the left you see the LNB port, for Universal or Unicable use.
- Next you have a green RF-in port for heartbeat in older installations.
- Then the Purple RF-out port also as an alternative heartbeat port, as well as sending RF to the 2nd Tv.
- The rest of the ports are the same as the 6S discussed just above.
I truly hope that these pictures and descriptions will make it easy for you to connect your DStv decoder.
