**No question. This will be an easy project. You need no special tools, just a few pieces of material and you are ready to start. By following my simple steps you will be done in no time. Lucky for us, the DStv engineers have now redesigned the system to be plug and play, without a lot of menu settings.
*Remember that Extra-view can connect up to 3 decoders and is just a new name for the previous two decoder setup called Dual-view. Because no special tuning is required, any novice can do this without requiring specialized knowledge.
Summary of the process:
- The only skill you need, is to be able to pull a cable from the dish to each decoder.
- Fit the end connectors to the cable ends. Then screw them onto the decoder and the LNB port.
- Then it is time for fixing the cable to the wall or skirting.
- Power up the decoders, so the new ones can down load the latest software. **This happens automatically.
- I told you the DStv engineers did a great job, to make it easy for you!
- Next it is just a few simple steps in the settings menu.
- Lastly you need to call Dstv to activate the system.
- So tighten your shoelaces, for here we go!
**In the following steps you are going to given the detailed process to do this task, plus the pro-tips to do it properly, for the system to work the first time round. I am discussing here an upgrade to 3 decoders, but if you are going from one decoder to two, the steps would be the same.
STEP 1. YOUR SHOPPING LIST:
- Buy tested items from a reputable installer or shop.
- Try to measure the distance from the dish to each decoder, horizontal and vertically, then add 30% and you won’t run out of cable.
- Buy three screw-on F- connectors for each new decoder cable.
- Buy Black UV-resistant cable ties and white 7mm cable clips.
- Get glue sticks for your glue-gun if you think you might need it.
- It might be dark in the roof void, so get batteries for your torch.
- You will need a Decoder for each extra-view point.
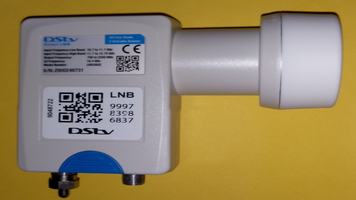
- A 4-port Smart LNB is required for a 3 decoder installation.
- Decoders come with a two-pronged plug , so get the relevant adapters.
* Please consider the following Tips:
- See if you can determine a route for the cable that will leave most of it in the shade.
- If you have conduits in your wall, feel free to use it for neatness. You can also take the cable up the wall behind the curtain, or on the outside behind a rain water down pipe. Another option is to take the cable into the ceiling inside a closet. It might be a bit more work, but it will really keep the lady of the house happy if she sees no cables!
- White RG6 cable is good for the inside, but does not last long in the sun. If you have to run any cables in the sun, buy Black Polyethylene cable at a somewhat higher price, but it is worth it, especially if you are going to live in the house for a number of years.
- If you need to work inside the ceiling void, open some tiles an hour or so before hand, so the roof can cool down on a hot day. This will also give you some additional light for navigating the roof beams.
- Remember, your safety is vital, so plan every move carefully.
STEP 2. TOOLS REQUIRED:
| Electric extension cord | 3-4 Meter Stepladder |
| Hammer | Knife & Glue gun |
| Side-cutter | Percussion Drill |
| 10mm x 400mm Masonry bit | Screw-driver + Patience |
STEP 3. INSTALLING THE LNB & CABLES.
- Installing the new Smart LNB is first on the list. If you currently have the standard 2 port smart LNB, loosen the LNB holders screw and remove the LNB by loosening the cable connectors. Install the new LNB in it’s place.
- *Tip: Looking at the dish from the front, you will notice the wires protruding at about the 4:00 o’ clock position. Do the same with the new LNB. You should immediately get a signal, and can do the LNB fine tuning by slowly rotating the LNB either clock or anti clockwise until you get maximum signal on the Decoders’ signal quality meter.
- Now it is time to install the cables for the new decoders. If you are going to take the cable up a corner, you will need to make a neat little hole through the ceiling board. This can easily be done with a no 2 Philips screwdriver. Just put it where you can see there is no beam above, and twist it a few times to go through the board.
- If however you are taking the cable outside and then up the wall, you will need to drill a hole through the wall first. Now you can feed the cable through the hole, and then pull it from the other side. If you are alone, it is easier to feed the cable from the top to the bottom.
- Once the cables are in position you can start putting the F-connectors on. Cut about 15mm of outer plastic off the end, then leave 5mm of the inner white plastic, by stripping away the rest. This leaves about 8mm of copper protruding. With the mesh wire & foil folded back, screw the F-connector onto the cable. Cut the excess copper off, so only about 2mm extends past the threaded screw-on section.
- On the LNB, the ports are marked A, B & C. You can connect your decoders in any order, except on the Universal one. *TIP: This you can later use to connect a 4th decoder, like an OVHD, if you like.
- Use your cable ties to neatly hold down the cables at the dish.
- Lastly, fix the cable to the wall & skirting with clips or glue.
DIAGRAMS:
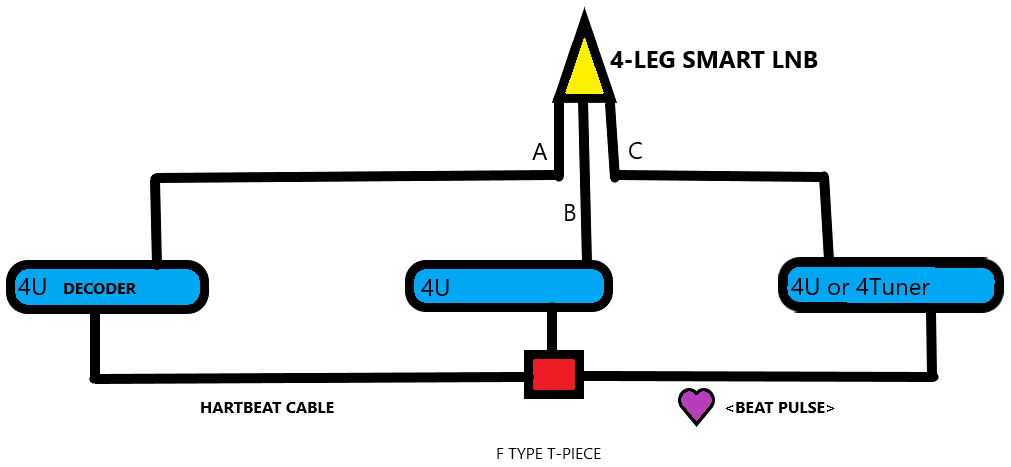
FOR OLDER DECODERS:
All older model decoders like the 1110 and 3U cannot receive the heartbeat via the Smart lnb. A separate cable is required for this, that you can see on the diagram below. Any of the three decoders can be the Primary (generating the heartbeat), sending it to the other two decoders via the 3way T-piece connector.
NEW MODEL DECODERS:
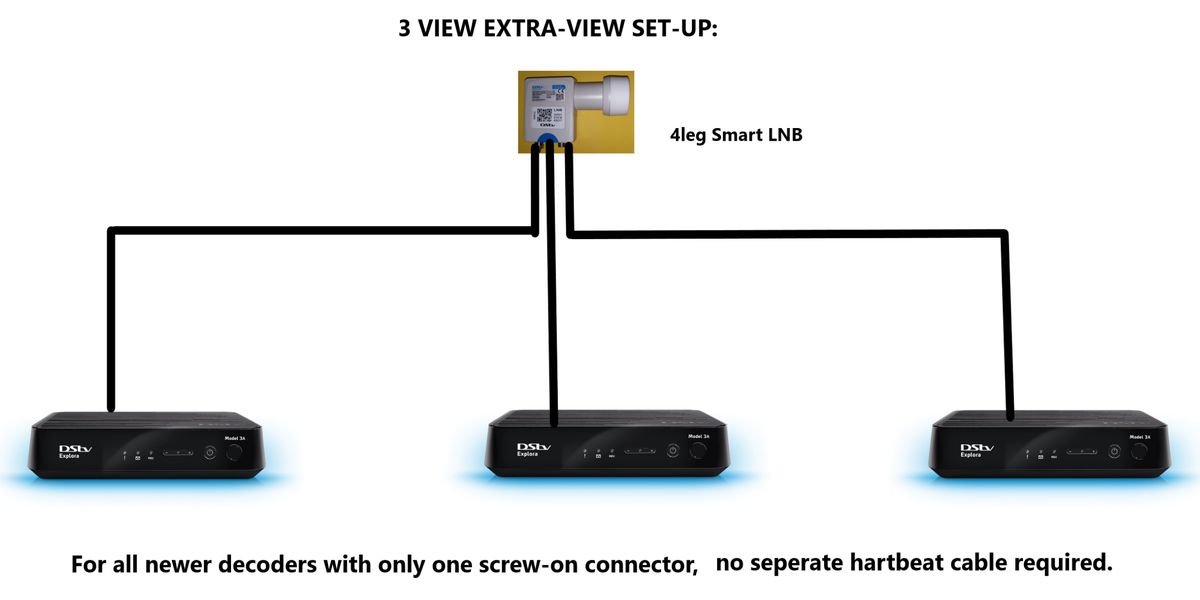
The latest single HD decoders, and Explora’s have only one F-connector screw-on LNB input, with no RF-in or RF-out. The heartbeat therefor runs out at the primary decoders LNB connector through the smart LNB, to the secondary decoders.There is no separate heartbeat cable needed, making it less work and much simpler.
IF YOU HAVE A COMBINATION OF A NEW AND OLDER MODEL:
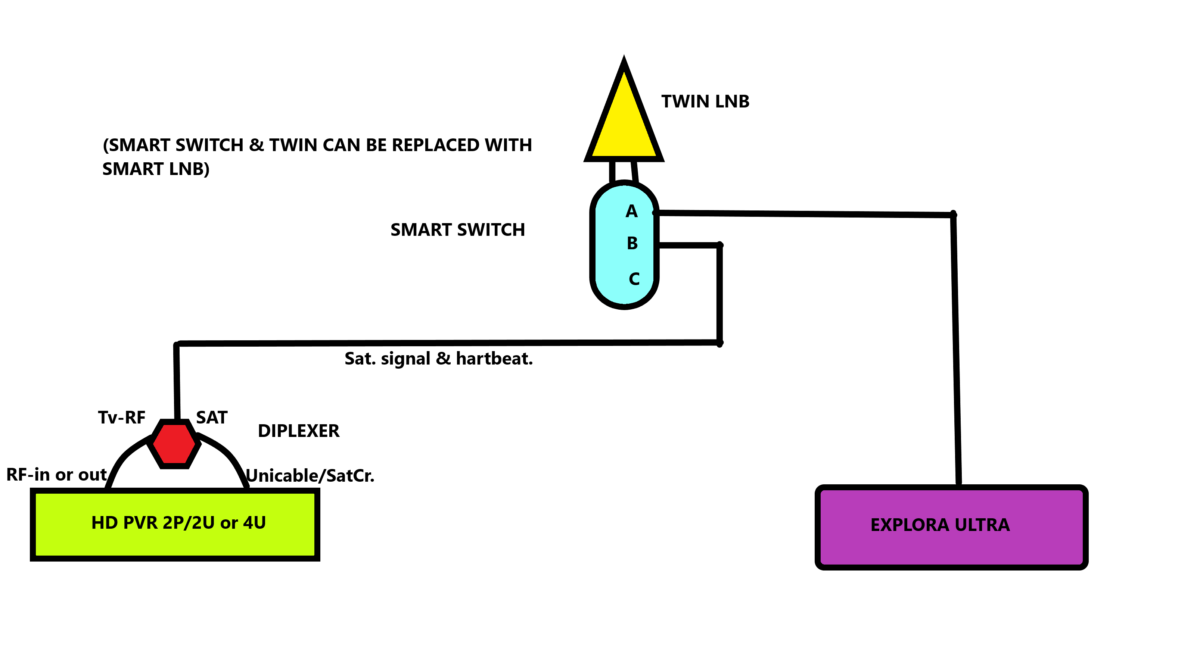
Here you will need a “DIPLEXER” to split the heartbeat out of the Satellite signal cable coming from the dish. The diagram below shows how to have extra-view with an Explora ULTRA and a HD PVR 2P. The Diplexer has a connector on the one side indicated as SAT/RF for the cable from the dish. On the other side it has two connectors. One is marked Sat. to go to the decoders SatCr/ Unicable input, where the last one would connect either to RF-in or RF out. What ever your choice. Just remember to match this choice in the menu where it asks you to indicate the communication port of the HD PVR.
STEP 4. CONNECTING THE DECODERS:
- Now it is time to connect the decoders. Position the decoders and connect each HDMI cable to the Tv. Then screw your cable from the dish onto the Uni-cable port. (LNB-in). Next fire up the decoder by installing the power supply. (Blue port).
- Your decoders will automatically boot up and then go through a sequence of updating its software. Just leave it, until it shows channel 100 after about 20 minutes.
- WOW! You have action. – Nearly done.
STEP 5. COMPLETE THE FINAL SETTINGS:
- Lets assume we are installing three Explora’s.
- Since your decoders are all working from one LNB, we have to separate their receiver frequencies, so they do not interfere with each other.
- Decide which decoder should be the primary-1, secondary-2, and secondary-3.
- You need to make no adjustments to the primary decoder.
- With batteries installed, use the remote blue button to get into the menu on Decoder 2. (Do the same procedure with decoder 3).
- Scroll left or right, until you get to settings.
- Scroll down to satellite settings.
- Then choose home network. (Press OK after each choice)
- Go to Installation wizard.
- Choose Satellite. (IS20)
- Choose Quick Setup.
- For Decoder 2, choose 2, and for decoder 3, choose 3.
- Click on Scan, for decoder to complete, and save data.
- Your primary decoder will automatically be on option 1.
- Now you are ready to activate your new decoders.
STEP 6. CALL DSTV TO ACTIVATE:
- Call DStv on 011-2892222 and go through the process to speak to a consultant. Then give them your ID number to access your account.
- They will be able to see your older decoders’ number. Just supply them with the number for decoder 2 and 3. Also tell them which decoder should be the Primary.
- They will then activate them one by one and if all is well, you will see your decoder channels coming on. Switch the decoders 2 and 3 from channel 100, to pay tv channels.
- If you happen to experience an Error Code like E107 or E16, don’t panic. Just tell the consultant the serial number of that decoder, plus the code, and they will reset it for you while you have them on the line.
- Remember, you will be paying a small fee for your 3rd decoder every month, but your debit order should handle that automatically.
** Now you can stand back and be proud of your latest achievement. Well done!!!
*What are advantages of extra-view?
- Each Tv has its own dedicated decoder and remote.
- The decoder is private and does not affect any other decoder in the house, when you change channels.
- You have a High Definition picture, connected by HDMI.
- Because there are less components, it is more reliable.
*What is the difference between Extra-view or just having an extension from the main decoder?
- With an extension, your picture is only SD – Standard definition.
- Long HDMI cables & splitters are very costly, and lightning sensitive.
- The main Tv at the decoder shows the same channels as the second Tv.
- Changing channels on one, changes channels on the rest.
NOTE:
*Not so long ago, one needed to also install heartbeat cables between all decoders. That is no longer required, only for very old type decoders. *You might also think of connecting your decoders to your internet facility in order to get more services from DStv at no extra cost.
