So many DStv subscribers can get frustrated when they can not find the command buttons on their remote to do certain tasks that they know must be possible. Trying to find this info on the internet is seemingly impossible. Here I will discuss the most important and handy functions of your remote, the easy and simple way. I will however only feature the latest generation Decoder/Remotes, but these are all just newer Upgraded versions of the older decoder remotes.
Usefull Remote control features for DStv users:
- The basic principal purpose of each button on your remote.
- Any secondary purposes of remote buttons.
- Are there any special setting on my remote that I should know?
- Why does my remote in my Tv Room constantly change the channels on the decoder in the far Bedroom?
- Why do remotes sometime stop working when someone just accidentally sat on it?
- If my remote does not want to work. Is it broken or is it just the decoder that is not responding?
- How easy is it to revive a dead remote. Is there life after Remote DEATH?
- Are there any special function that my remote can do to make my life more pleasant?
- What are DStv Phone APPS?
The A10 that replaces the A9 Remote.
One will notice that there are fewer buttons compared to the A9 below, with the main purpose to help us get to the Movie channels faster. Here are the changes for you to look out for:
| Buttons removed: ARC, Profile, Tv-Guide, Playlist, Catch-up & Box-office. |
| Button re-positioned: HELP- is clearly marked & easy to find. |
| How to find removed Button functions?- Just use the Blue HOME button. |
| On the blue Bar at the top of the screen you will find things like: PLAYLIST, |
| TV-GUIDE, SEASON MANAGER and CATCH-UP. |

Here is an example of the A9 remote that used to come with an Explora ULTRA:
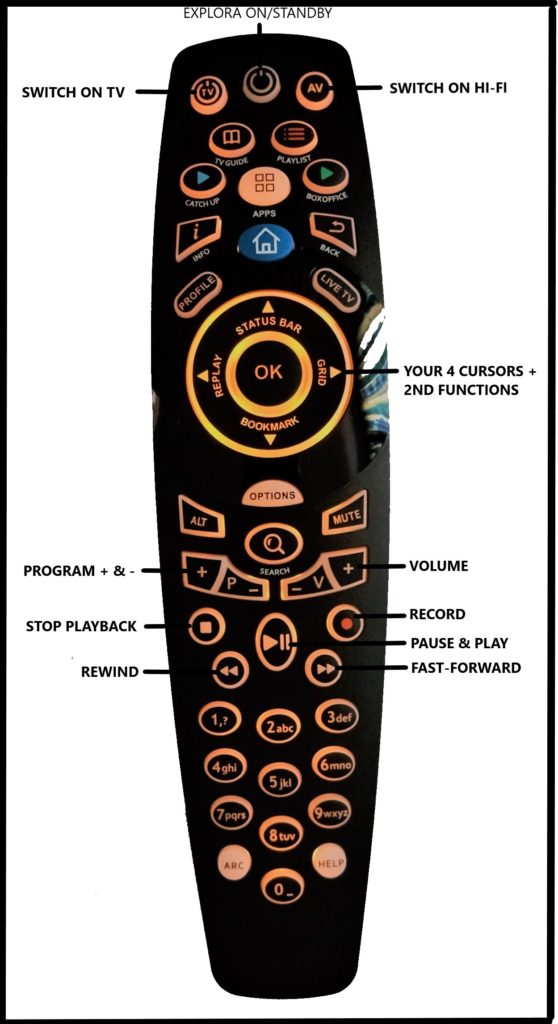
1.LET US BREAK THE BUTTON FUNCTIONS INTO 4 SECTIONS:
TOP PART:
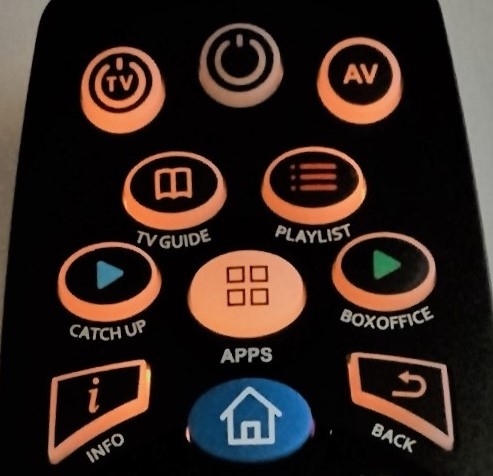
| 1. TV Button to switch your Tv on and off. |
| 2. Middle top button = Decoder ON or STANDBY. – Also used to REBOOT Decoder when kept in for a few seconds. |
| 3. AV Button can be used to change the SOURCE on your TV, once it is programmed by the instructions below. |
| 4. The TV GUIDE button is a shortcut to the list of programs where you set up your recordings. |
| 5. PLAY LIST is the short cut to get to the programs that you have already recorded ready to watch. |
| 6. CATCHUP is a shortcut to the most popular programs that DStv records for you automatically every week. |
| 7. APPS is the quick direct shortcut to features like Netflix, Youtube and Showmax etc. |
| 8. BOXOFFICE takes you directly to the feature where you can rent the latest movies. |
| 9. INFO brings up the information bar. Press it twice for even more data. It has a second function discussed later. |
| 10. The BLUE Button is your main MENU. The longer route to all Major & minor decoder functions. |
| 11. BACK removes all unwanted menu’s from view, going back to your previously watched program. |
SECOND SECTION:
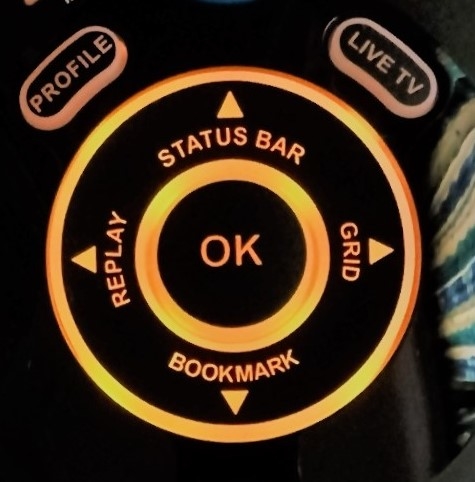
| 1. The PROFILE Button is there to access Special Features. |
| 2. The LIVE TV button takes you back to your last watched DStv program, after you’ve been to an APP like Netflix. |
| 3. Your GRID Button brings your available Program list to the screen for easy access. Just highlight & press OK. This button also has a second function: As your Right CURSOR/ARROW |
| 4. The REPLAY Button gives you instant 10 seconds replay as soon as you press it. Also is used as LEFT Cursor. |
| 5. STATUS, you use to Fast forward past all those nasty adverts, using the Fast forward Button. Also your UP Cursor. |
| 6. BOOKMARK, is the one you use to mark specific songs in a concert that you would like to easily get back to. It also backs up as your DOWN CURSOR. |
| 7. Pressing OK confirms your selection. Just pressing it, will take you to the APP’s like: Sport, News and Weather. |
Remember when using your remote, to watch the screen at the bottom for special features, options and instructions on how to get to where you want to be.
THIRD SECTION:
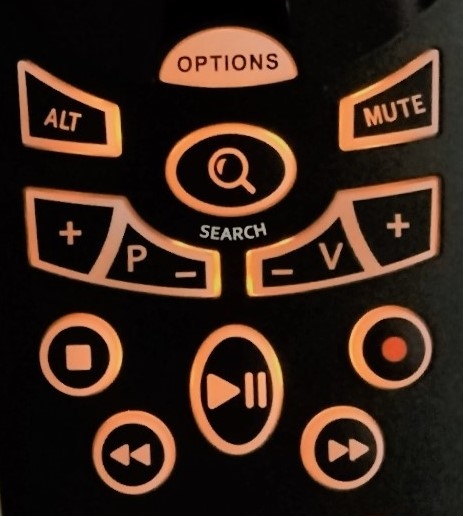
| 1. OPTIONS. gives you options to choose from no matter what screen/menu you are visiting at that moment. Most of these buttons have a multitude of tasks to perform, like bringing up a Keyboard for filling in forms. |
| 2. ALT. Will mainly help you to quickly jump between two channels – back and forward. |
| 3. MUTE. does just that. On some decoders you have different levels of Muting. |
| 4. SEARCH. Is a Hotlink to listings of Sport or Movies. |
| 6. The square block on the left is to STOP a replay or a recording in motion. |
| 7. The middle bottom button is to either PAUSE or PLAY, not only a recording, but also LIVE TV. |
| 8. At the bottom left is your REWIND button,with the FAST FORWARD button to it’s right. They also work together with the STATUS BAR Button and the BOOKMARK Button in order to scroll left or right. |
FOURTH SECTION:
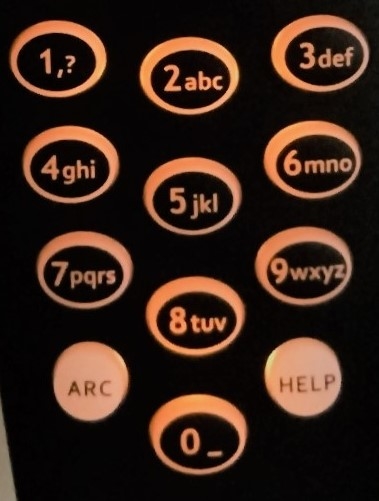
| 1. The NUMBER Buttons first task is to enter channels numbers that you remember from 001 to 999. These buttons also has a second function to enter alphabetical letters when needed in SMS format. |
| 2. ARC is a Hotlink to quickly resize the TV-screen to be optimal for your television or projector type. It does have a second function purpose as well. |
| 3. HELP gives you all kinds of info of your decoder, account and technical statistics. It also has a second function. |
2. CAN I SWAP THE REMOTES OF MY THREE DECODERS?
DStv Remote control MODE settings:
- It is possible to interchange your remotes if all three your decoders are the same models.
- If they however are too close to each other they may interfere.
- That is why they have the ability to be working on different frequencies MODES.
- A new remote (For decoder 1) comes standard set to MODE 1. with the standby button flashing RED.
- The second, Decoders MODE 2, flashes GREEN when pressing any button.
- The third decoder is then set to MODE 3, which flashes ORANGE when operated.
- The MODE is changed by pressing INFO & BACK together, keeping them in until you get two flashes.
- Once you have them setup it is best to keep each remote with it’s own decoder.
- You have to change the MODE while in front of the decoders that you plan to operate with it.
- Then go to MENU-SETTINGS-REMOTE SETTINGS to select the MODES to ignore by that decoder. That means that decoder 1 must respond only to MODE 1, and Ignore MODE 2 and 3. ( Do all your decoders this way).
- Now it is impossible for a remote in the bedroom to change the channels in your Tv room.
3. SPECIAL SETTINGS:
How to operate you TV with your DStv remote.
Programming your Explora Remote for these tasks are not only possible, but very easy. Use is made of the second function of certain remote control buttons in a specific sequence.
STEPS TO PROGRAM YOUR DSTV REMOTE TO WORK YOUR TV: (auto).
| 1. Press and Hold the TV & ARC button until TV flashes RED 2 times – release it. RED button will come on & stay on. |
| 2. Then press the numeric button that has the first letter of your Tv Brand on it. – Tv should switch off. (ie. 5 for LG.) |
STEPS TO PROGRAM YOUR DSTV REMOTE TO WORK YOUR TV: (Manual.)
| 1. Press and hold TV & ARC until TV flashes RED 2 times – release it. Then place DStv & Original remote facing each each other. Dstv remote will now learn from original remote. |
| 2. Press TV once on DStv remote & release. Then keep the Power button on the Original(TV) remote in until DStv remote flashes green twice. While in learning mode, do the same with Vol+ & Vol-,Mute and AV (Source). Leave remote for 30 sec. It will flash 3 RED blinks, and will now be fully functional. |
STEPS TO ACTIVATE & DE-ACTIVATE YOUR REMOTE’S VOLUME BUTTON:
| 1. Keep in and Hold the ARC button and the Volume + button to De-Activate. |
| 2. Keep in and hold the ARC button and the Volume – button to Re-Activate. |
PLEASE REMEMBER: You can only program one additional device onto your DStv Explora Remote. You have to choose: Either your Television, DVD or Sound amplifier (Soundbar).
4. WHAT DO I DO IF MY DSTV REMOTE STOPS WORKING?
First thing to do is: DO NOT PANIC! THE CHANCES ARE 90% THAT YOUR REMOTE IS STILL WORKING. Someone may just have accidentally sat on it activating one of the Special programming MODES. This can be resolved by checking which buttons don’t work, and rectifying it from the information above.
| A VERSION OF ALL THESE PROCESSES CAN BE FOUND ON THE DSTV WEBSITE FOLLOWING THESE STEPS : 1. Go to www.DStv .co.za. 2. Click on SEARCH at the top right of the page. 3. Enter “Remote controls” into the search bar. 4. A block will come up with one of the options being DStv Remote Controls. Click on it. 5. Choose your remote from the list by clicking on it. 6. This will then bring up an Quick Guide on Advanced settings in an Acrobat file that you can download or print. |
Quick ways to find out if your remote is still working:
- Press any button to see of you have anything light up. If it is dead or very dim, it could just be the batteries.
- If batteries are good, take your cellphone and switch on the camera. Now aim the remote into the camera lens while pressing any button on the remote. You should see the remote LED flashing continuously on the phone monitor screen. Flashing means remote is working.
- When pressing any button the Green LED on your decoder should flash, indicating good remote function.
- If you still get no decoder response the remote could just be in the wrong MODE for the specific decoder. Just follow the steps in the MODE SETTINGS section above.
- Next step would be to buy a new remote, or borrow one from a friend to test.
5. THE THREE WAYS TO GET TO YOUR DESIRED DSTV PROGRAM:
| 1. IF YOU REMEMBER THE SPECIFIC CHANNEL NUMBER, YOU CAN JUST ENTER IT ON THE NUMBER BUTTONS. |
| 2. YOU CAN SCROLL UP OR DOWN WITH THE CHANNEL UP & DOWN BUTTONS. |
| 3. IF YOU CANNOT REMEMBER THE CHANNEL NUMBER, JUST PRESS “GRID” AND ALL CHANNELS WILL BE IN FRONT OF YOU STARTING WITH THE SMALLER NUMBERS AT THE TOP AND BIGGER NUMBERS LOWER DOWN. * JUST SCROLL DOWN TO THE ONE YOU WANT, AND ONCE IT IS HIGHLIGHTED CLICK OK |
I am in the Shop, – which DStv remote must I buy for my decoder?
| B5 =4U HD decoder. | A4 = 2P/2U PVR decoder. | A7 = EXPLORA 3A. |
| B6 = HD decoder. | A5 = EXPLORA 1 | A8 = EXPLORA 3B |
| B7 = S-Series HD decoder. | A6 = EXPLORA 2 | A9 or A10= EXPLORA ULTRA |
